Dominate Kharg Island BF3: Essential Mine & Vehicle Tactics
Kharg Island, a name that resonates with strategic importance both in real-world geopolitics and within the thrilling digital battlegrounds of Battlefield 3. In reality, Kharg Island is a critical oil export terminal, a vital artery for Iran's economy. In the virtual realm of BF3, it’s a sprawling, vehicle-centric map where controlling the flow of armored assets is paramount to victory. To truly dominate this dynamic battlefield, a deep understanding of mine placement and strategic vehicle deployment is not just an advantage – it’s a necessity. This article will delve into actionable strategies to help your team secure and maintain supremacy on Kharg Island.Unlocking Map Control on Kharg Island BF3: The Minefield Advantage
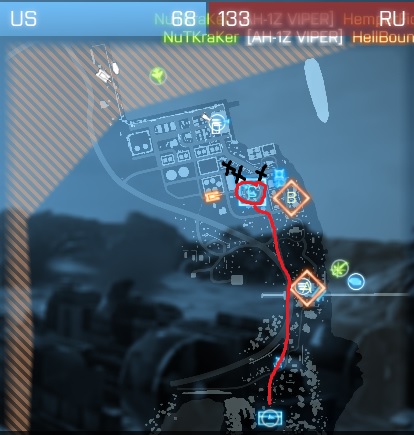
On Kharg Island, the battlefield is vast, and the distances between objectives can be punishingly long, especially for infantry. This environment makes vehicles the undisputed kings of the road. Your primary goal is to be the only team consistently fielding strong armor, and the foundation of this strategy lies in effective mine placement. Think of Kharg Island’s key vehicle routes and chokepoints as "black X's" – critical junctures where enemy armor *must* pass. These aren't just random spots; they are the arteries connecting enemy spawns to objectives, particularly point D. Understanding the map layout reveals a significant distance between the enemy's main deployment zone and the central capture points. This means that losing a vehicle early forces players to either respawn at a far-off deployment or, more commonly, at a closer objective like point D, but critically, *without* their valuable armor. To capitalize on this:- Early Game Aggression: As soon as the round begins, engineers (ideally supported by a Support player for resupplies) should prioritize laying down anti-tank mines along anticipated enemy vehicle routes. Focus on the main roads leading out of their deployment towards D, as well as the approaches to B and C. These initial minefields are crucial for crippling the enemy's early armor push.
- Strategic Chokepoints: Look for narrow passages, blind corners, and the crests of hills where vehicles often slow down or are forced into predictable paths. Placing mines just over a small rise or around a sharp bend can catch unsuspecting drivers off guard. The pathways leading directly into and out of D are prime candidates.
- Layered Defenses: Don't just drop one or two mines. A cluster of three anti-tank mines is usually enough to destroy even the heaviest tanks. Place them strategically, perhaps staggered, to catch vehicles that try to swerve. Consider placing mines slightly off the main track where a vehicle might attempt to bypass an obvious minefield.
- Objective Guardians: Mines aren't just for deployment routes. Place them around contested objectives like D to deter enemy pushes or surprise vehicles attempting to flank. A well-placed mine can deny a capture or buy your team precious time.
- Support & Resupply: This strategy heavily relies on engineers. Encourage your Support players to drop ammo boxes near engineers, allowing them to constantly resupply and lay down more mines. This synergy is key to maintaining a perpetual threat to enemy armor.
Commanding the Armor Division: Vehicle Supremacy on Kharg Island
Securing vehicles is one thing; keeping them alive and operational throughout the match is another. On Kharg Island BF3, your armor division is your lifeline. Losing your tanks and APCs can quickly turn the tide, leaving your infantry vulnerable to enemy vehicle assaults. The map's design, with its large open spaces and distant deployment zones, magnifies the impact of vehicle losses. If your team's armor is consistently destroyed, your players will face the same dilemma as the enemy: long runs from deployment or respawning at a forward point without heavy support. Here’s how to ensure your team maintains vehicle supremacy:- Protect Your Assets: Engineers are not just for laying mines; they are the mechanics of the battlefield. Prioritize repairing friendly vehicles. A well-coordinated squad with a dedicated engineer can keep a tank in the fight significantly longer, even under heavy fire. Communicate with your vehicle drivers – tell them when you're repairing, and when they need to retreat for safety.
- Calculated Retreats: Don't be afraid to pull back your armor when under heavy attack or outnumbered. A damaged tank that retreats and gets repaired is far more valuable than a destroyed one that leads to a long respawn timer. Use cover, smoke grenades, and team support to facilitate these tactical withdrawals.
- Exploiting Spawn Mechanics: The reference highlights a crucial strategy: "do not push onto their last point, especially on this map. Let them respawn at their last point and turn this into a vehicle vs infantry battle." This is gold. By holding most of the map but *not* taking their final objective, you create a strategic bottleneck. Enemies will respawn at their last point (typically deployment or an uncontested flag near it), and because of the long distances and your control of vehicle spawns, they'll primarily be running as infantry. Your superior vehicle force can then systematically pick them off, preventing any organized push. This conserves your tickets and grinds down the enemy's.
- Denying Enemy Armor: Beyond mining, actively target enemy vehicles. Engineers with RPGs, Javelins, and anti-vehicle gadgets are essential. Recon players can use C4 or guide air support. Air vehicles, particularly attack helicopters, are devastating against ground targets. The more enemy vehicles you destroy, the further they have to run, and the more likely they are to be caught in your minefields or fall victim to your armor.
For more detailed strategies on managing spawn points and leveraging armored units, consider delving into Kharg Island BF3 Map Control: Mastering Spawns & Armor.
The Strategic High Ground: Point C's Overlook and Tactical Pushes
While vehicle combat dominates the open terrain, specific objectives offer unique tactical advantages. Point C stands out as a critical vantage point for controlling the flow of battle around D. The reference states: "From the point at C, there is a good vantage point that can almost completely overlook D." This isn't just a minor observation; it's a game-changer.- Overlooking D: Controlling C grants your team an elevated position with excellent sightlines over D. Snipers, LMGs, and even vehicle-mounted machine guns from C can effectively suppress enemy infantry attempting to capture D or move between D and other objectives. This sustained pressure can make it incredibly difficult for the enemy to establish a foothold at D.
- Spotting and Target Acquisition: From C, recon players can spot enemy movements, vehicles, and infantry pushing towards D, providing crucial intelligence for your team's armor and air support. This proactive spotting allows your anti-vehicle assets to pre-emptively engage threats.
- Denial of Reinforcements: Any enemy infantry or light vehicles attempting to reinforce D from their deployment or other points will often be exposed to fire from C. This essentially creates a kill zone that funnels enemies into disadvantageous engagements.
- When to Push for the Win: The reference advises: "And by all means, if your team is dominating feel free to move onto taking the entire map to end the game sooner." If your minefields are effective, your vehicles are controlling the map, and C is secured, then a full-scale push is warranted. When the enemy is clearly floundering, don't prolong the match – press your advantage and capture all flags for a swift victory.
- The Armor Push Caveat: However, a crucial piece of advice from the reference is: "Remember too, do not push with armor." This isn't a contradiction but a tactical nuance. While your armor is essential for map control, avoid blindly pushing heavy vehicles into urban areas or tight chokepoints where they can be easily ambushed by infantry with C4 or RPGs. Use your armor to dominate the open spaces and support infantry pushes into objectives, but don't overextend them into meat grinders.
For more in-depth strategies regarding the C point and effective pushing tactics, explore Winning Kharg Island BF3: C Point Vantage & Push Strategy.
Beyond the Basics: Advanced Kharg Island BF3 Strategies
Dominating Kharg Island goes beyond just individual actions; it's about cohesive team play and adaptability.- Counter-Mining: Just as you lay mines, expect the enemy to do the same. Be vigilant for enemy mines, especially around objectives and main vehicle paths. Recon class with their MAV can spot mines from a distance, and skilled vehicle drivers can often destroy them with a well-aimed cannon shot before driving over them.
- Air Superiority: Do not underestimate the power of air assets. Attack helicopters can quickly clear infantry and suppress enemy vehicles, while jets can be invaluable for taking out enemy air threats or strafing ground targets. Coordinate ground troops to spot targets for your air support.
- Infantry Roles: Every class has a role to play in supporting vehicle dominance. Assault provides suppressive fire and medics for ground pushes. Support provides crucial ammo and LMG fire. Recon spots enemies, designates targets, and can use C4 for devastating anti-vehicle ambushes.
- Communication is Key: In a map this large and vehicle-dependent, clear and concise communication within your squad and team is paramount. Call out enemy vehicle locations, mine placements, and any threats to your armor.
- Adapt and Overcome: The enemy team will adapt to your tactics. Be prepared to switch up your mine placements, adjust your vehicle routes, and change your objective priorities based on the flow of the battle. If they start clearing your mines effectively, consider laying them in less obvious spots or in combinations (e.g., C4 on the road with mines slightly behind it).